Monday, October 22, 2018

Cabin modification for better motor access

I've used the boat for a couple of seasons now, and one of the things I've enjoyed the least is the big stretch over the aft deck to operate the kicker.  I even end up crawling up onto the deck on my knees a lot of the time.  Tall people would probably be able to reach fine, but I'm only 5'8" and wanted better access.  Here's how I solved it.


I've since made a hatch and rounded off the stub of the tiller.  I've also extended the rope steering back to where it doesn't interfere with standing in the new space.  The tiller still works well with an extension if one doesn't want to use the rope steering.

I had the boat out on the Columbia last week for a motoring only trip, and this has worked out exactly as I'd hoped.  Motor is easily reached and operated standing in this space.  I REALLY appreciated it when i ran out of gas sooner than expected upstream of the Glen Jackson bridge and started floating down towards the pilings.  Grabbed the gas can and filled the tank without spilling a drop in perfect safety in about a minute flat.  Also made it much easier to operate both the motor and the tiller near the dock.

A definite success.

Sunday, October 7, 2018

New professionally built sail from Really Simple Sails

As everyone following this knows I've been wondering how much sail area the Robbsboat really needs.  The originally designed 138ft2 on an 18 ft mast is definitely too much around here.  I built the original tarp sail @ 120ft2, and only needed the full area on the very lightest of days.  I spent most of the time on the first reef, which was @ 95ft2.

I finally had Mik Storer build me this one over at Really simple sails.  100ft2 with 3 reef points.  Came out nice.


Got it out for the first on the water test back on September 28th.  Headed downwind against a 1 knot current on the Columbia river between I5 and I205.  My velometer in the parking lot said the wind was hanging out between 3 and 6 knots.  I was going between 1.5 and 3 knots that way.  I got up to 4 plus knots when I fell off to any kind of reach, the current helping with the apparent wind and the SOG. Camera battery died before I got turned around and headed back upwind/down current, but here's some good shots of the sail shape with the wind behind me and going against the current.


I'll get some video with better wind and some tacking soon.  Hopefully before the season ends this year.  

Friday, June 29, 2018

Good day sailing. Decent wind, right amount of sail up

So this  boat has been on the water for like 2 years now.  Due to a ridiculous amount of truck trouble, I haven't been out that much.  That's all fixed, and I'm getting some sailing in on a regular basis.   I went from high wind with no reefs to a bunch of light wind days with reefs available and a cautious attitude after 2 days in the Gorge with no reefs.  This was a day where I had light to moderate wind with the right amount of sail up to play without pushing the envelope.  Great day sailing, boat was a delight.  I had the first reef in, which puts me @ 92ft2 of area for the day.

Tuesday, June 5, 2018

Lazy jack and leeboard modifications.


I've had fixed ladyjacks on the boat for a while now, and they've really helped keeping the sail and yard controlled and contained on the water, especially when dropping the yard and sail.  The 2 areas where they've been a little deficient is when initially rigging the boat, and getting everything out of my way when motoring/sculling/coming up on the dock.  The height hasn't been adjustable.  I decided to make them adjustable with another dumb sheave at the mast head over the one for the halyard.  I reinforced the sides with some Ply before drilling the new hole as I'm pretty close to the tip with it.


I'll have a running line down the front of the mast that will let me slack them far enough to easily attach to the boom without the yard hoisted.  before I had to lift the rig somewhat to attach the lazyjacks, and that was best done by hoisting the yard on the trailer before launching.  If there was any siginifcant wind and it wasn't from dead ahead,  that was a bit of a struggle.  Once rigged, I'll now be able to hoist the boom to whatever level I currently desire, including well above the slot for sculling, motoring and coming into the dock.  I can also fine tune the tension for whatever reef I'm currently on.
The second thing I've done is rectify a problem I've had since i built the boat.  When i made the leeboard, there wasn't enough width on the stock to leave the "ear" at the top for the downhaul and potential uphill. so I just drilled a hole in the corner.  This made for some leverage issues on the up haul, and left the board a bit wiggly when up hauled in the water.  So I laminated the ear on.  Hopefully this will be strong enough for the lateral loads when raised.  Plenty strong for the uphaul/downhaul function.


As soon as the last coat of paint dries, I'll get it all rigged up and show the functionality of the new lazy jack system.


Monday, May 28, 2018

Memorial day sail for 2018 at Hagg Lake

The forecast was for reasonably cool and a little bit of wind.  I slept on Saturday, took care of chores on Sunday, loaded up the dog and headed to Hagg Lake.  The wind was noticeable but not in the least bit heavy when I got to the parking lot.  The last time I had the rig up was at the Depot Bay boat show, and I'd left the second reef tied in for hoisting to show people.  I went ahead and left it that way and got the boat in the water.  It's easier to shake one out than tie one in, and I had the dog with me with not life vest for him.

I was amazed.  I'm guessing the wind was blowing in the 5-10 range, and with two deep reefs tied in I was hitting 4.5 knots often.  I can definitely get by with a smaller sail than the @ 120+ ft2 one I have now.  I built two more limber spars already, and I have another one of Polytarp Dave's tarps that was just a little too small to do the current sail.  This is an easily driven hull in light winds.

I went ahead and bought a Gopro with the head harness this fall.  I have a contour on a head strap, and it's been a good camera, but the Gopro head harness setup is much more comfortable and solid.  This ended up being a really good showing of the experience of sailing the boat and how I have everything set up now.  Got a little work to do on the leeboard control lines, but everything else is now working pretty well.

I do have a tiller extension set-up, but I find the rope system I was using to be really flexible for steering positions and easier to get out of the way when needed.  The extension is awkward behind me, and the ropes were great that way, and immune to position or elevation.  Mainsheet is in it's final configuration for sure.


I have 5 more parts to this.  they're each 4 gigs, so they'll come in installments.  Just sailing, very little talking.  Just the occasional outburst by some old bastard in the boat he built.

Thursday, April 5, 2018

Playing with different rig layouts

As everyone following this knows I've been wondering how much sail area the Robbsboat really needs.  The originally designed 138ft2 on an 18 ft mast is definitely too much around here.  I built the original tarp sail @ 120ft2, and only needed the full area on the very lightest of days.  I spent most of the time on the first reef, which was @ 95ft2.  I finally decided to Have Mik Storer build me one at 100ft2.

The sail above is what I ordered, complete with the three reef points shown.  It's shown above on the 16ft mast I actually built using Jim's originally designed 5 degree mast rake.  Here's how it looked the first time I rigged it in the Driveway.


Here's one still show from actually in the boat


I sailed it for the first time on the Columbia river between the I-5 and I-205 bridges on a light wind day.  My velometer in the parking lot was ranging from 3-5 knots of wind with an occasional little gust up to 6 or 7 knots.  I headed off downwind against a 1 knot current, and maintained a speed between 1.5 and 3 knots, even with only 100ft2.  It's enough, especially with the improved aerodynamics of a properly cut sail.

Here's a video of that sail.  Too little wind to be very exciting, but it shows the shape of the sail and the experience of sailing it Paradox style from a beach chair with steering ropes.  I've pretty much decided that's how I'm going to operate it most of the time.  The going back and forth on tacks is hard on my 55 year old knees, and the boat is so narrow I don't pick up THAT much extra righting moment.  I'm better off reefing when my weight low and centered isn't enough.


New entry, surgery on the aft of the cabin to make it easier to operate the kicker.

Thursday, March 29, 2018

Hatching a new hatch Plan

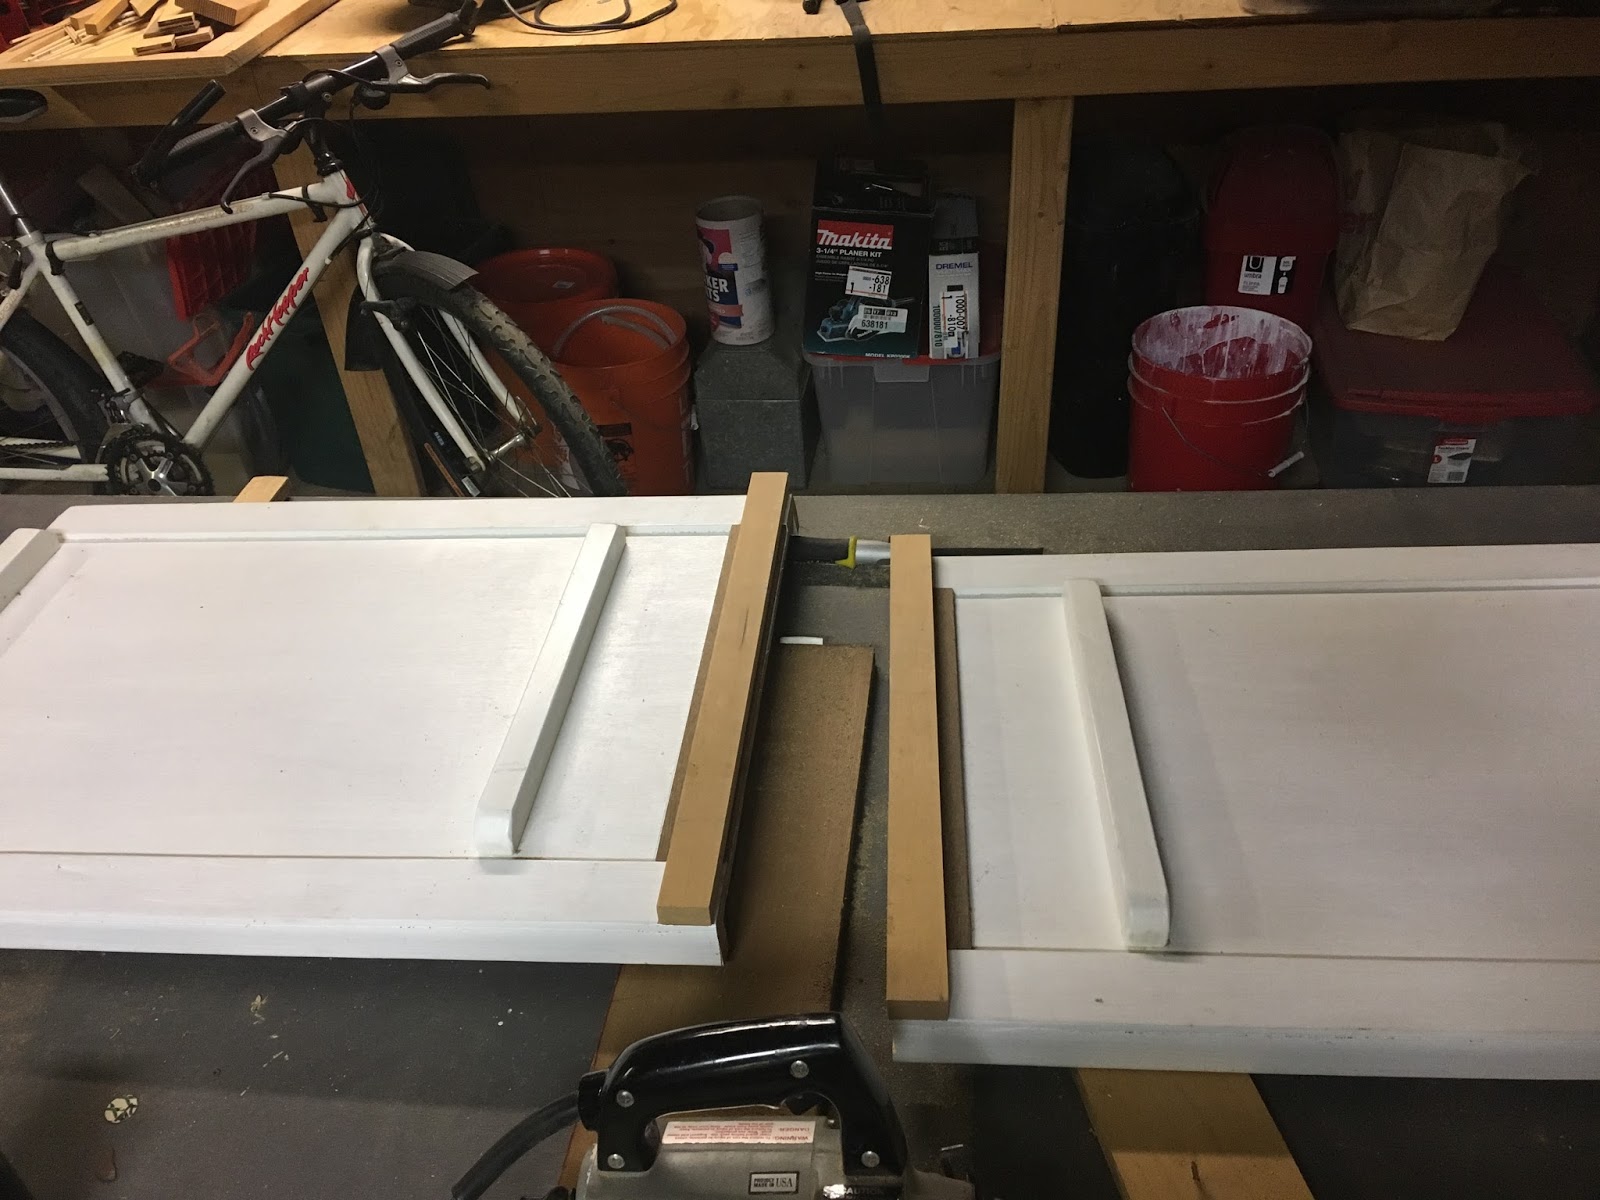
These are the original "Quick and dirty" hatches I build for the boat.  Front with window, rear with window and the one for the top of the slot.  The fore and aft stored in the boat just fine, but the top one ended up being 59" long x 20" wide, and was a tough thing to stow inside the boat underway.  So Decided to cut it in half.  I ended up with 2 pieces at 30" x 20" that are easily stowed inside the boat in several places.


Obviously I want to keep the hatch joint freeway in the rain tight, so I built an interlocking joint.


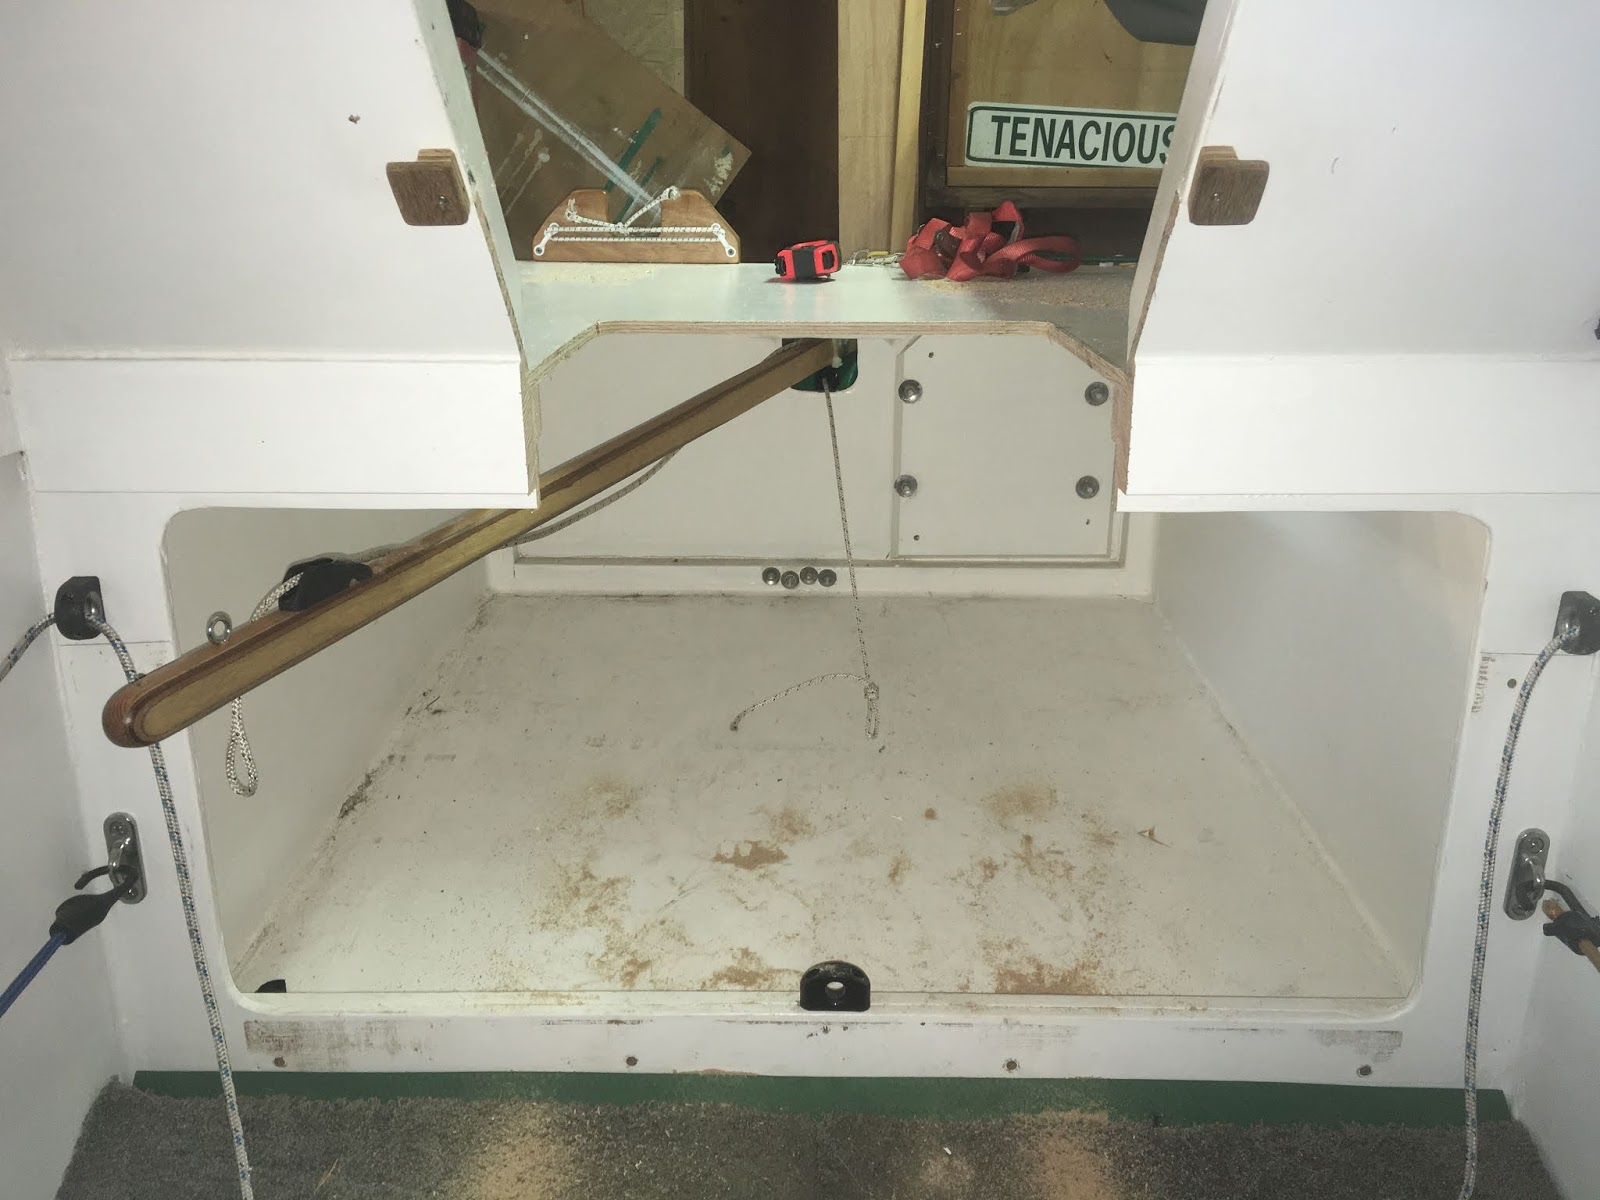
I wanted something quick, cheap, simple and secure for battening everything down both on the trailer and on the water.  Shock cord and thumb cleats made out of scrap plywood work just great.


When the hatch was full size, I could slide it back and forth on the rails to stand in either end.  The thumb cleat and shock cord detail allowed me to secure it in many positions.  I now can just install one of them and have the other easily stored in the boat at only 30" x 20".  Good foul weather setup that allows me to stand provided the wind isn't too strong for the sail i have up at the time.  I don't show the rear companionway hatch installed here, but it most certainly can be, and leaves me a nice 29" x 16" opening to stand in well supported and protected.


In the picture above, you can see where the top hatch pieces now normally store.  I stuff them along the sides right behind the batteries.  Just quickly tuck them behind my Perma-bungees like I do with the throwable cushions to keep them out of my way when needed.  The fore and aft covers can get stuffed lots of different places being much smaller.


Aft hatch in the normal position with ventilation through the bottom, matching the opening at the bottom of the front hatch.  Rain tight but well ventilated.  I can of course wedge something in these openings to cut the airflow if needed.  In bug season I'd only need a little bit of netting at these openings.


The bungee system on the rear hatch lets me slide it down like this to ventilate out the top instead of the bottom.  This is what I'll probably do when using a cabin heater or cooking inside to keep from Asphyxiating myself.  The front hatch ventilates through the bottom end always.  The taper on the opening keeps me from sliding that one up or down like this.


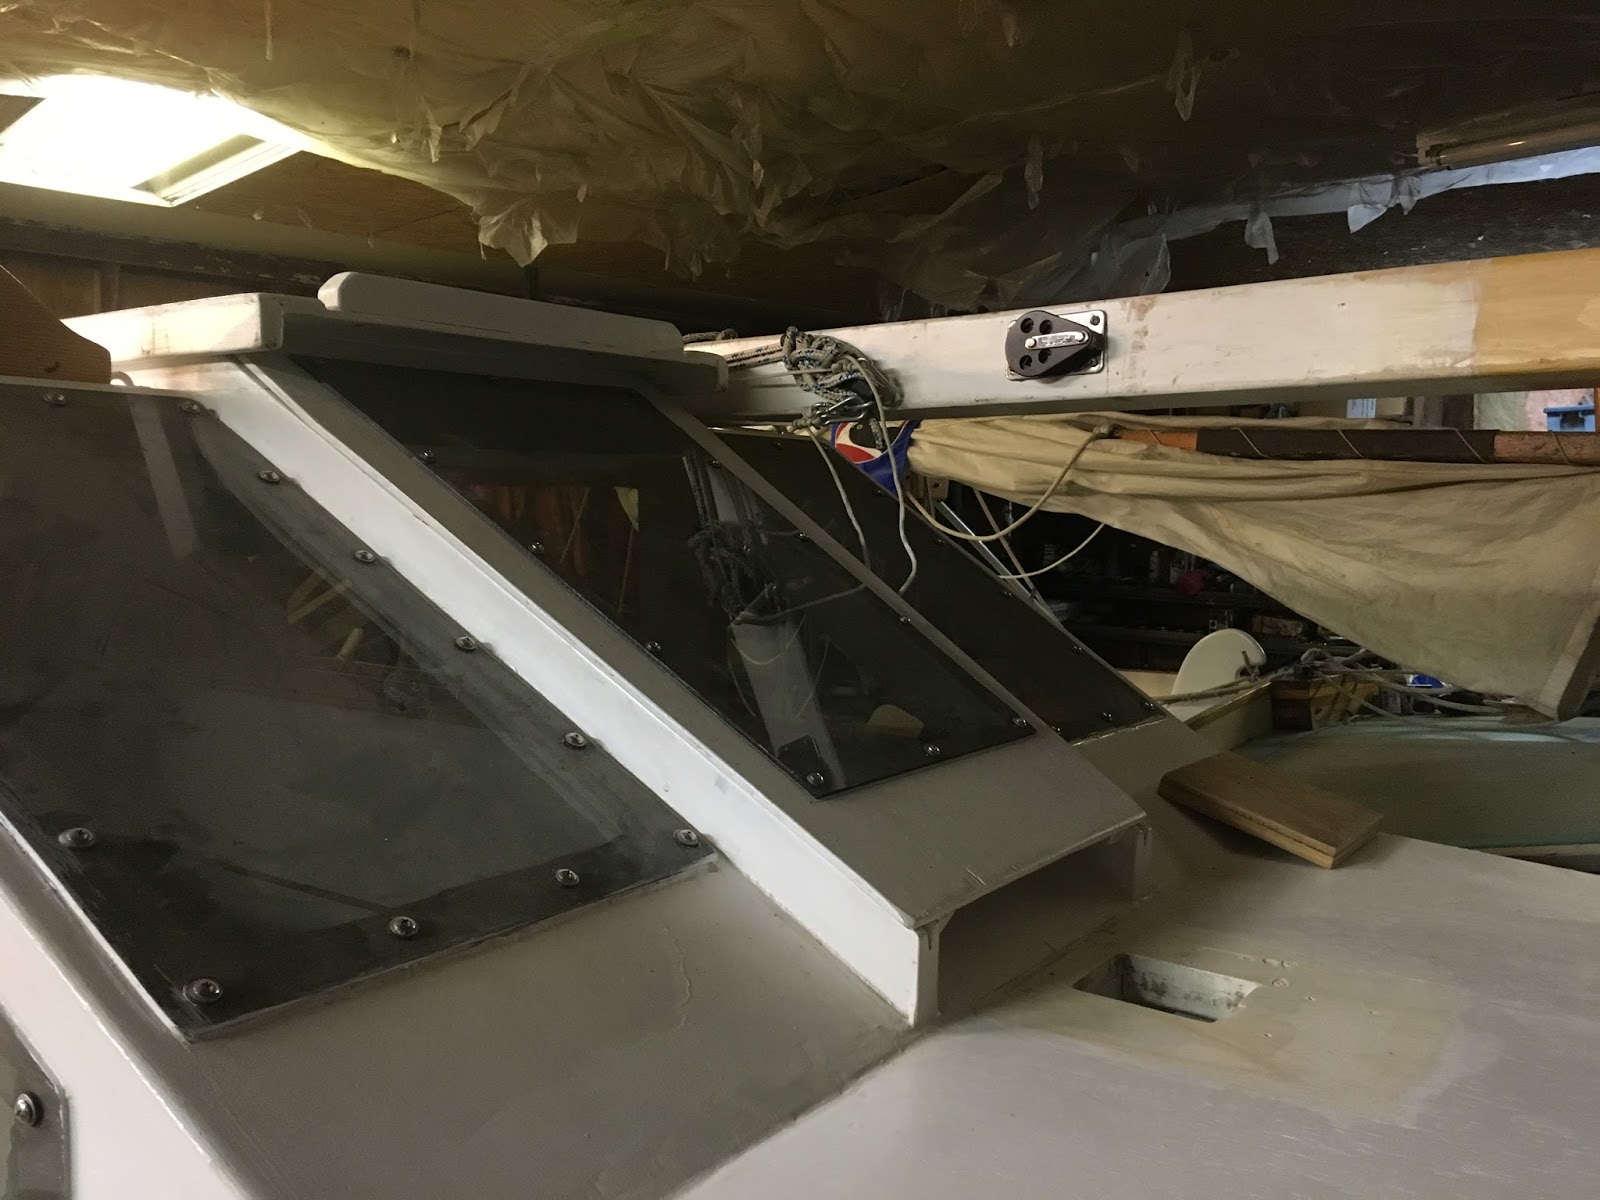
The front hatch opening I've been talking about.  Also in this picture is another issue I've been meaning to deal with.  The Mast opening in the foredeck.  No good way to seal that with the mast in place, or even with it out of the opening in transit.  The hole is also flush to the deck, making any water on the foredeck an easy path into my front storage area.  But I found a solution.


More lumber from the scrap pile.  There's a reason i never throw away any wood bigger than a playing card.


The finished product (except for paint, bedding, screwing it down, and putting the rigging fittings back)


I can now take a plastic bag, cut a hole in the bottom and slide it up the mast before stepping it.  Bungee the bag tight to the mast and the bungee the bottom of the bag over this collar.  Whole mess raised off of the deck so only water running down the mast has any chance of getting in.


I'm now rain and spray tight.  Even in a knock down past the slot edge not much water should get it through the slot before she self rights.  If I have the hatches battened that is.  I have a little more lean that will allow me to put a window in each of the top hatch pieces to let me see the sail when underway completely enclosed.  More on that when I get it done.