Thursday, April 21, 2016

More bits and peices

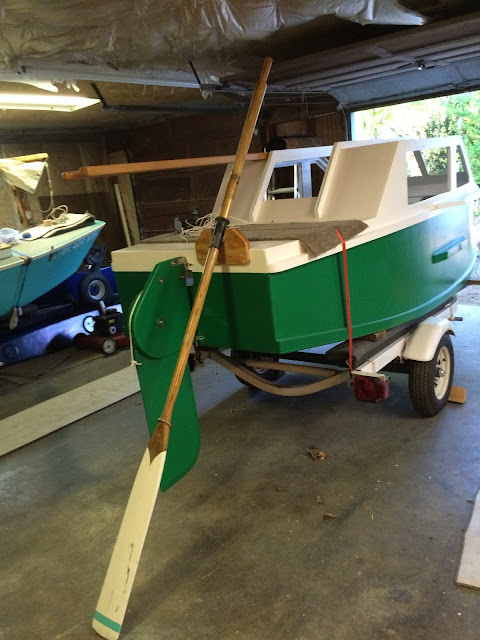
Now that I have a sculling notch for the oar, I need someplace to store the oar.  It will fit inside the boat, but that's messy an inconvenient.  Got to work on some fittings to store it on the cabin top for quick easy deployment as well as keeping the mess out of the house.


The other thing I've been going around on is the motor mount for the 2hp.  I was going to put it off until I found the shaft on my trolling motor was to short to use the sculling notch fitting for a mount.  Garelick makes a hideous steel and plastic fixed mount that mounts too low on the transom for how I have it built and reinforced to use a short shaft, which is what I already own.  Part of the problem is that the hideous chunk of plastic protrudes @ 3" above the brackets.  I was in my local 2nd hand chandlery the other day and found one of these cheap.  I figured I'd just build a shorter mounting block and use the brackets and hardware.  I can even notch the one I've made if I need the motor to go a little lower.   Got to work gabbing all of this and here's what I ended up with.


Of course we need to get some finish on all of this stuff before actually mounting it.  Got a coat on last night, and another coat this morning.  I'll get a third on this evening, and then maybe a fourth depending on what kind of build I've got after the 3rd.  Everything will get screwed down and the motor mount will get bolted up over the weekend.


Wonder where those windows and that tarp are.......

Monday, April 18, 2016

Alternative Propulsion Plans

So the wind will occasionally die or I'll need to get off a beach or dock before being able to raise the sail.  This is NOT a design well suited to paddling or rowing.  That leaves motors and sculling.

I've reinforced the port side transom to take a motor mount for my little 2hp evinrude.  I'm still shopping/condsidering custom fabrication of that motor mount.  Everything "on the shelf" is way to heavy and bulky and rated for 15hp.  I'll probably end up making that myself.

More immediately I need the sculling option.  It would also help to have a separate mount for the 24lb thrust minkota I already own.  I've already got at least one newer group 24 deep cycle and I've already installed the battery boxes.  between that and a sculling oar I can take my time on the 2hp mount.

Here's what I came up with to mount on the transom.  The notch fits the shafts on the 8' oars I have in my Pelican until I can build something custom in the way of a Yuloh.  height and width match what's needed to mount the minkota.


It will mount on the Starboard side transom and allow me to scull standing in the aft end of the slot.  Hopefully  The shaft on the Trolling motor is long enough that I can hang it on here as well.


Trolling motor is too short unless they make surface piercing props for Minkota.  I'll have to see if there's a longer length shaft motor I can get.

Saturday, April 16, 2016

Detail inside as I wait for the tarp and windows to show

I finally sourced my windows pre-cut to shape with radius corners and a polished edge.  My oldest brother has a glass company in Idaho, and I dropped him an email.  He's making them all for me out of light grey smoked Lexan and shipping them.  Cost couldn't be beat.  Thanks steen :-)

They're not here yet though.

I dropped Dave over at a Polysail a gentle reminder that he was going to ship me a larger tarp.  He's been so busy with his church project that he can barely keep up with the sail business.  He bashfully admitted he'd forgotten to ship it, and would take care of that immediately.

It's not here yet though.

So I tore into a bunch of the little details inside.

One of the things I knew I needed was a rail under the tiller to avoid too much load on the bolts holding it to the rudder head.  The thing is pretty long, and there's a tendency to rest the weight of your hand on the tiller.  I generally wouldn't use red oak in a boat, but I had a piece just the right size and this thing bolts on and off real quick with wing nuts to give me better access to the compartment if needed.  I also rigged the rudder up haul/downhaul as a continuous loop.  I put the jam cleat on top for the up haul.  I put a loop in the up haul back near the transom with the rudder up, then passed a bungee through the loop and hooked it to a fairlead I had screwed to the bottom of the tiller behind the rail.  I need to fine tun the tension, but it's working well.


The other thing I did was mount the Group 24 battery boxes in the cabin.  this is actually the deepest part of the boat, so they couldn't be better located.  My lead/acid group 24 deep cycle weighs 43lbs.  I'm thinking of putting that on one side then putting @ 40lbs of tools in the other box if not a second battery.  Jim specifies 200lbs of steel bolted to the main frames for and aft of the cabin.  Now I only need @ 120lbs, and I'll use that for final fore/aft trim on the boat.  Here I'm sitting with my back against the rear bulkhead with me legs stretched.  I'm only 5'8", but essentially there's a "Pilot Area" 4ft long and 45" wide  to hang out in.  A pair of 24" long coolers will fit perfectly in front of the batteries on each side.  Center aisle will be clear for walking the slot and full length stretch-out when sleeping.


A pair of flotation cushions puts me at the perfect height for seeing out the windows without bumping my head on the roof.

The tiller is right at the height of my knees if I stand in the aft end of the slot.  No hands steering standing up in the appropriate winds.

I can also stand further forward and reach back with my feet to steer.


Another angle on the cockpit area

I'll make hatches and a lid out of that greenhouse plexiglass eventually, but I bet I end up sailing this as a slot sop 95% of the time with all of those stowed.  I'll probably make some soft covers as well.  That's all down the road as I live with the boat.  Or maybe next weekend if the windows and the tarp haven't shown yet.


I also threw a few coats of Varathane on the "Temporary" mast stop I fabbed real quick the first time iI tried stepping it.  It REALLY helps to steer the butt of the mast during the process.  It's not quite straight due to the haste of the initial fabrication and placement.  Oh well :-)

I also measured up to get some high density closed cell foam matting to put on the floor.  Both to protect the wood and paint, and for a little "give" on the old knees.  It's OK if it's dense and heavy, it will act as further "useful" ballast.

Sunday, April 3, 2016

Spars done and first hoist. Getting ready to make a sail.

I started coating the mast butt.  In the meantime, the tiller was cured enough to do final assembly on the rudder.  Got it entirely rigged except for a jam cleat on the tiller.  The up haul/down haul are a continuous line, the jam cleat will work for either.  I'm going to rig a loop to a bungee on the downhaul side for shallow water.  I'm in deep water most of the time, or I would have gone to the trouble of doing the lead sink weight.  As it is, I think this will work better for me where I sail.


Next step is get the sail loft set up.  Put loads of crap away, swept and even vacuumed the concrete.


Unfortunately Dave over at Polysail mixed up my order with another and sent me a tarp that's just barely too small.  He's letting me keep this one and sending the new one.  I tried laying it out and just fudging the dimensions a bit, but it's not going to work.  I'll have to wait for the larger tarp to get here.

Saturday, March 26, 2016

Boat right side up and getting all the spars done

Today was kind of a landmark.  I finished fabricating the yard and boom.  I drilled the holes for the peak, head, tack and clew attachments for the sail.


This is the mess left by shaping the boom and yard with the power planer.  Can't believe how big a pile you end up with off that little bit of shaping.


I've decided to go with a dumb sheave for the halyard to begin with.  If it's too much friction I can always change to a block.


 My Kit from Polysail showed, so i can start in on that soon.  My brother and nephew came by and we flipped the boat back upright and threw it back on the trailer so I can roll it around again.  First thing I did was roll it outside and step the mast.


The mast is 16 feet, the boat only 15 feet.  This is AFTER I shortened it from the 18ft that Jim designed.  I just don't need that much sail area.  The yard is the designed length and I shortened the boom @ 1.25ft.  It was only 6" shorter than the boat as designed.  The design sail area is 138ft2.  I'm gonna end up with @ 112ft2 with 2 reef points.

The little raw wood block in front of the mast was quickly added to brace the heel of the max against as I tilt it up.  Helps a lot, it will become permanent.  I might even modify the front of the cabin and build a step IN the cabin to make it super easy.  There's a little effort lifting/balancing the mast and stabbing it through the deck.

Build the sail.  Install the windows.  Rigging and finish modifying the trailer.  The end is in sight.


Monday, February 29, 2016

Window frames a bust. Bottom paint and Mast making.

So the whole window frame idea was way too tedious.  I'm screwing the plexiglass to the hull like almost all of the boats I see online do.

I finally got a couple of strong backs over to help me get the boat off the trailer and flip it for bottom paint.  My nephew and one of my brothers.  This gets me wondering how she's going to float on her side and how much ballast I'll really need.  I kept the slot and hatches as narrow as I thought was comfotably workable.  16" seems to work out okay.  The coolers will pass through as well as my butt and waist.  No real trouble to work the shoulders in and out either, and I'm well supported stepping the mast or just standing up at the helm.

And the rest of the way over.  Next step is to get the shiny off of the epoxy to the paint will stick.  This turned into a real chore because of all of the subtle dimples in the surface.


I got started on the mast as well.  I found a couple of 2x4x16 studs at Home depot that didn't look TOO bad.  Dirt cheap.  Hard part was finding anything dry and light.  One was that way, and I finally settled on a damp one to sister up to it.  I'm going to have a grand total of @ $15.00 in wood and glue, so why not just call it practice for some more expensive wood it it sucks?


So there's the blank.  Time to start marking out the taper and shaving.  Mean while I got the primer then 3 coats of color on the bottom.  Came out all right.  This is oil primer and latex semigloss.  I'll leave it upside down for 3 weeks to let the paint get hard before I flip it back.


I can finally see how much board I'll have in the water.  Can't send it all the way down on the trailer.  I think she'll go to windward just fine and tack on a dime.

Then I got the mast all shaped up.


This is the top of the mast.


This is the butt end.  well rounded so there's no sharp edge bearing no matter ho I end up turning it.

There's a slight curve towards one of the boards, or to say it another way you can see the curve if you sight the glue line.  I was thinking I was going to turn the seam fore and aft, but the slight curve lets me help adjust rake if I run the seam athwart ships.  after a couple hours of power planing and sanding, those cheap studs don't look half bad.  Jim says he designs around lumberyard materials......

Sunday, December 13, 2015

Started making the window frames

Kind of a lull in activity the last week or two.  I'm in the Heating business and it's winter.  It's also been so dark and wet, I just haven't wanted to be out in the garage.  All that being said, I got a little done today.  I started ripping the 1/4" Marine plywood into the strips to make the window frames.

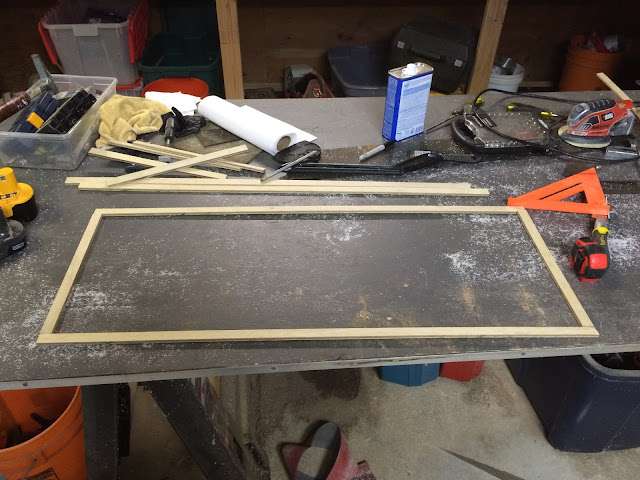
I had a bunch of 2" strips ripped up for a Junk sail batten experiment.  I was going to use them for center webs with a bunch of holes drilled on both sides to Thai lace individual sail panels between.  I was going to glue dimensional lumber on the sides for rigidity.  That never went anywhere, so I ripped it up for the window frames.  1-1/2" strips and 3/4" strips.

Cut a bunch to length to make the frames for the large rectangular window on each side, and got them laid out.


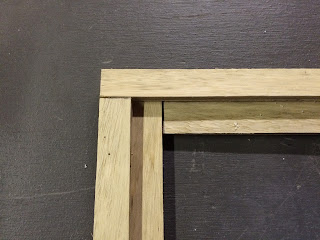
Alternating overlap in the corners


 And now I notice that my Gorilla glue is hard in the bottle.  I need to get a 60 tooth table saw blade anyway for ripping the Plexiglass, Time for a Home depot trip.

I'll glue these frames up solid and get them sanded and pre-painted.  I'll set the Plexi into the frames with @ 1/8" clearance all the way around for expansion, and bed them in latex caulk.  I'll then screw the whole assembly onto the boat, again bedding with latex caulk.   A couple coats of white paint on the cured exposed latex, and the window is done.

Once again a "little job" that's going to burn a lot more time than expected.  I think it will be a better job and much more professional looking than a bunch of silicone and exposed screws right through the plexiglass.  Using latex caulk will let me pull the frames and change out the panes if it's ever needed.  The latex is also real easy to refresh without pulling everything apart.