Saturday, October 31, 2015

First finish coats on

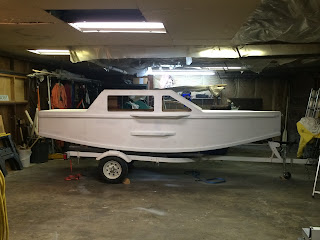
I don't know how much visual difference there'll be for people reading this, but I've just gotten the second coat of semigloss Acrinamel white onto the hull this morning.  I've pretty much got full cover with the one coat of primer and two of the finish.

I'd do another coat of the white tonight, but the guys down at the Miller store told me one a day at the current temp and humidity.  I was dow there picking up the color for everything under the bashwales. I'm going with a Green that's appropriately name "Aquadazzle".   Apparently because of the heavy color, I need to give that two days between coats under these conditions.  We're running @ 50-60 degress and raining like hell in Portland OR.

Here's the stuff I'm using.


And here's how she's looking now.


Looks like I won't be able to post the two tone for a bit.  I was told I'd nee 3 coats of the green to obtain the shade I chose, and there's a 2 day wait between coats.  I't supposed to get cold tuesday, then run between 45-55 degrees for the rest of the week.  I imagine I'll have the color on by next weekend.

Saturday, October 24, 2015

Time to Prime. Hull all one color for once.

Today was a long day.  4 mile walk with the dog.  sand the whole hull again with 150 grit.  Thoroughly clean boat and garage.  lunch and a little TV, then time to get the dog out again.  Home and a little dinner then out to the shop to paint.  Sit down after shower with laptop to post, 10:20pm.

It's a good tired though.

Here's the boat with the top half primed tom my color break.  I'm thinking a cerulean blue or hunter green for the lower.  Don't want to go too dark.

Cant't stop there though.  that was all the hard stuff.  Motored one through for the whole exterior.  I was rolling and tipping the primer.  Maybe a waste of effort at this point, but I wanted to get the motions down again for when I get to the finish coats.

All one color outside.  A major landmark in a boat building project.

I was lubricating my painting arm with a little Pendleton.  The glass of course got primed.


That's OK, I fixed it.  Primer is on that glass pretty good.  It's a good sign.


Friday, October 23, 2015

Fairing and windows

So I got the whole boat sanded with 150grit.  Some may remember that I used some Mahogany ACX plywood and turned the C side out as recommended by Bolger and Payson.  Some of the grain runs pretty deep in that veneer, so I took a pass around the boat with some epoxy fairing compound to hit the worst of it after the initial sanding.

I'm going to sand one more time.  Any imperfections remaining are either going to be taken care of with glazing compound after the primer is on or just remain for eternity.  I told myself when I started this project that I was just going for a work boat finish.  Things were coming out so well that I started raising the bar on that.  Thing is, it's starting to dip under 50 at night and I want the paint on before winter proper sets in.  The shop isn't heated.

Next boat that I want to have any real lifespan, I'm springing for the Meranti at Mr Plywood.  There have been many steps in the process where i would have appreciated the higher quality material, and this step is just the icing on the cake.

The good thing that happened this week is I saw 1/4" Plexigass with a light tint on Craigslist for $30.00 per 47x64 sheet.  Some guy pulled apart his greenhouse.  There're some scratches and such in places, but this is almost twice the amount i need for the boat.  I can practice my plexiglass skills on the worst portions before getting down to business on the nicer parts.  Jim Specified 3/16", so this is just slightly heavier than specified.  The tint is almost perfect, not too heavy.


So the goal for this weekend is to sand the whole boat again and get the first coat of primer on the exterior.  I'm waiting on the cabin interior until i know i've glued all the bits inside that I'm going to want.  I'll probably do the interior above the Gunwales so i can permanently install the windows, But I know I'm going to want solid tie downs for battery, cooler, jam cleats, etc.  If I just nail those to the bottom and sides with no dimensional timber buildup, I'll be constantly in danger of running a screw tip through the exterior.  

It just hit me last night that once the paint is on the boat I could actually throw the 2hp on the back and take her for a ride.  I'll wait until spring though when the paint has had plenty of time to harden and I've finished the sailing rig.  That's the plan anyway, and I ALWAYS follow the plan.....

Sunday, October 4, 2015

Framing finished

So I've officially finished all of the pieces that go into the hull and have nothing left to do but fill, sand and paint.  The windows and hatches will be plexiglass and mounted after painting, so I guess I technically have those to make.  Other than that, It's just the mast and spars, which are pretty quick and easy.


I rolled her outside and whipped up a batch of epoxy and filler and started plugging screw holes and cracks.  Left her outside in the sun to cure.  I'll give it about 3 days and start in with the 80 grit all over.  One more run around with filler and the sand, sand, sand.  Hopefully I get all of the paint on before the real cold sets in.  I left the rig to last on purpose so i wouldn't be tempted to run her down to the water before the paint has a chance to get good and hard.


Friday, October 2, 2015

HATCH FRAMING ROUGHED OUT

New day.  Got home soon enough to rough out the timber for the hatches and clamp them down to scribe the bevels where they intersect.   I'm leaving all of the final cutting, fitting and gluing for the weekend with a good night's sleep under my belt.


I'm going to groove the top faces of the fore and aft rails for some gutter action under the plexiglass hatches.  I'm going to leave the slot under both ends open for routing lines and ventilation.  I'll have a chunk of round pipe insulation cut to length to stuff in each end If I need to stopper the airflow for any reason.  Jim showed a separate ventilation hood under the front windows, but i see no reason not to make the hatches do double duty here.


Thursday, October 1, 2015

Roof is on

So I got some 3/8" ACX picked up and cut out the top of the canon pieces and got them glued and clamped down.


Yesterday I had a lousy morning.  Bad trip to pick up permits at the city.  Crap phone call from an unreasonable General contractor looking for a complicated design and bid in not time flat with no notice.  Got home @ 8:30 and went out to pull the clamps off and fair up the edges.  

It's been time to sharpen up the hand planes for a while.  After slow/almost no progress, I went against my better judgement and picked up the power plane my brother loaned me.  I really need to get good with the thing, It's much faster than the hand planes.  I'm not there yet.  I took one pass too many on the Port/forward edge and basically took off the top layer of veneer over the window opening.  Crap :-).

I put the tools away and went in for a nightcap.  It was just one of those days.  Just a little more filling and sanding to do over what I already had in front of me, not the end of the world.